The idea for designing a tilt sensing illuminated tunnel book has been one of my favorites this year.
To learn how to build your own, please visit my tutorial over on the Chibitronics blog. There, you'll find a circuit diagram, cut file, and several different examples.
Wanting to figure out an easy way to add light to a handmade carousel book, I had the opportunity to do some prototyping during an extended power outage.
This was my first prototype of the Carousel Book Light.
The results turned into my latest tutorial for Chibitronics, the Carousel Book Light (featuring Chibitronics LED stickers, of course).
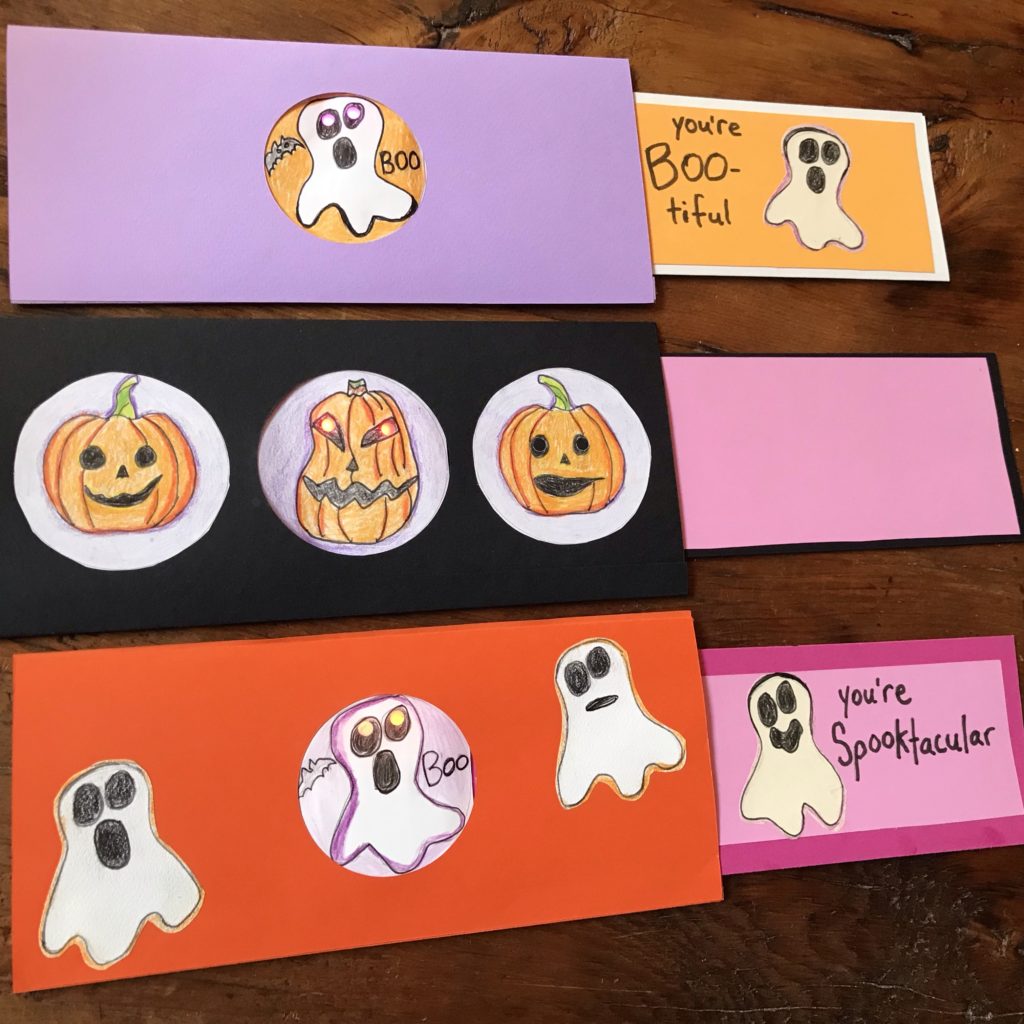
In my latest tutorial, Dissolve Card: Light Up Picture Switcher, I’ll show you how to make a light-up version of a Victorian Era mechanism known as a dissolve, or dissolve card.
This paper mechanics project combines a trick of the eye (and pictures that flip) with a little electronic trickery — Circuit Sticker LEDs and a sliding switch!
While the examples showcased in this project have a Halloween vibe, the paper circuit techniques you’ll learn may be applied for a variety of themes!
Two alternating images create an optical illusion in a dissolve card.
I designed this pop-up rainbow card to light up the sun whenever the card is opened. My favorite thing about it is the sliding switch mechanism that connects to the piece of paper that gives the rainbow its dimension.
To view my complete Rainbow Pop Up Card tutorial, which includes custom cut files that may be uploaded to a home fabrication machine, please visit the Chibitronics website.
I recently created a couple of Haunted House tutorials using Circuit Stickers and pressure sensitive conductive plastic, which combine to create amazing special effects! I hope you'll check them out.
This is another example of an illuminated flying concertina book; this one features orange and pink Circuit Stickers sandwiched between collaged fish! (See my last post for the tutorial). In this model, I made a couple of improvements that will increase the beauty and durability of the book.
After reinforcing the Circuit Sticker with conductive fabric tape, I covered the entire sticker and the conductive fabric patches with a square of clear packing tape. This will help ensure that the fabric tape and sticker will not eventually come loose.
I also added a little piece of white vellum to the side of the fish that comes into contact with the LED. The vellum creates a subtle diffusion of the light.
If you'd like to learn how to make a fluttering, light-up accordion book like mine, I've created a couple of different tutorials to help you get started.
The prettiest tutorial lives on the Chibitronics website, along with a multitude of resources related to paper circuits!
A version with more photos, and a downloadable PDF, lives at Instructables.
I hope you'll give this project a try and let me know what you think!
It's been a while since I've added anything to this blog! I've been binding a lot of books, some containing circuitry; but, I haven't been great about documenting my process!
One of my newest electronic experiements adds LED goodness to the "Flat-Style Australian Reverse Piano Hinge" binding, more easily referred to as an "Australian Hinge" or "Australian Piano Hinge" structure.
If you'd like to learn more, you can view my latest Instructable!
Forgive me in advance if you are taken aback by my subject matter in this post, but sometimes art is the best way to wrangle with angst and uncertainty. In this case, making a presidential pop-up did the trick.
I created this beauty using the principles of Robert Sabuda's Frankenstein. I almost went so far as to make his comb-over pop-up as well, but diplomacy and my better angels won out.
And let's face it. The outcome could have been so much more disconcerting if I'd positioned the lights where his eyes are.
When a QR code in my book is scanned, this illuminated pop-up glows steadily while a LilyPad buzzer plays the tune "This Land is Your Land" (see video). While my subject matter may not be to everyone's liking, I take solace in the juxtaposition between a welcoming Woody Guthrie anthem (played on a tinny buzzer) and the image of a divisive wall.
My biggest take-away in constructing this pop-up was that paper circuitry may be used as more than just a tool of personal expression, but an instrument of political commentary. I found the experience cathartic.
From a technical perspective, conductive fabric works very well for pop-ups with folds that need to bend a lot.
I used conductive fabric tape in places where the copper needed to bend.
In the future, if I'm going to continue making illuminated pop-ups, I'll need to better design my books to accommodate the added bulk.
This is the back view of the pop-up, prior to being glued down
In my most recent experiment with paper circuit pop-ups, I scanned artwork from another page in my book and used it as a backdrop for a related image, a raised fist holding a pencil. The new piece packs far more punch than the original.
Chibitronics Circuit Stickers
I did a better job of concealing the copper leads this time.
I've been experimenting with creating light-up pop-ups, in a book controlled via a Photon microcontroller. I initially tried to light up both sides of the statue (and both sides of the book in her arms), but I ended up abandoning the idea after several failed attempts (and lots of short circuits). It had seemed easy in theory, but it was far more fiddly than I expected.
The copper tape, connected to the Photon, runs from the center of the book up the pop-up's arm.
Only one side of the statue lights up.
I used conductive fabric tape in the gutter.
In the end, I decided to illuminate one side the torch and a border around the pop-up. The torch flickers like a candle, while the border glows steadily.
I overlaid a fresh piece of paper with a cut-out for the pop-up.
I haven't decided whether I want to write on this or just leave it the way it is.
For those of you who may be wondering what type of music my internet connected story book plays, when the Particle function is triggered, I've uploaded a short demo video above.
I got a head start by looking at this "Music Time" tutorial that plays "Never Gonna Give You Up" by Rick Astley. Since I didn't want to rick roll people, I changed it.
In a future iteration, I'd like to figure out how to get the lights to flicker in sync with the music.
Sugar skulls and sensors have captivated my interest lately. The video above features my latest paper circuit (another prototype for a potential book cover), powered by triggering a Chibitronics sound sticker sensor. Originally, I'd set out to see if I could use a surface mounted light sensor to trigger the lights on my circuit, but I haven't been able to figure out how to do it without the use of a serial monitor. Perhaps, I'm making it more difficult than it needs to be; but, I keep hitting roadblock after roadblock. I can get a photo-resister to work on a regular Arduino board, but I haven't been able to replicate it on an Attiny85.
In any case, getting the sound sensor to work was a breakthrough in and of itself!
Although I am happy with the outcome, I must admit that it took me a couple of days of exploration and failure to get the code to actually work! My first attempt was a disaster, resulting in my having to cut the Attiny85 off the paper after I'd soldered it down.
Lessons Learned:
1. I really need to start using my multimeter.
2. Don't solder your microprocessor until you've verified that the code works.
3. Not all surface mounted LEDs are created equally. The super bright ones available from SparkFun are my personal favorite.
4. Naming the analog pins works differently when using a sensor. For example, what I'd normally refer to as "Pin 4" is called "A2" in the code (something that I'd like to better understand).
Last night, I was so excited about the completion of my first blinged-out book that I started reading about the new circuit stickers that I bought online.
In the process, I discovered 21st Century Notebooking, a new Google+ Community! This community is connecting the book arts with the National Writer's project, which has only increased my desire to play around with this medium!
I've learned that Jie Qi, a doctoral student at the MIT Media Lab, has links to several cool tutorials at Chibitronics. I am so inspired by her work that I am going to start experimenting with journaling in my blinged-out books, by integrating artwork and circuitry in between the pages.


